
As far as Ecommerce platforms go, Salesforce Commerce Cloud is a pretty popular one. According to Builtwith, it is the 7th most popular platform in the top 10k sites in their Enterprise category. At time of writing, it won 234 sites from Magento, 70 from Oracle and 35 from Websphere.
All of the above means that it is more and more likely that at some point you may be called upon to replatform to Salesforce. And a replatform can mean only one thing:
Redirects!
With that in mind, below is a quick guide on how to implement redirects for your site in Salesforce Commerce Cloud.
Why redirects are so important during a replatform
Before we dive in and walkthrough how to implement redirects within Salesforce Commerce Cloud it’s important to touch upon why they’re so important.
And if your URL structure changes but you haven’t set up a 301 redirect the new URLs will struggle to rank, with the end result being a serious loss of traffic.
The 3 types of redirects in Salesforce Commerce
The good thing about Salesforce as a platform is that once you understand how to set up redirects, it’s pretty easy to do so.
There’s no need for dev support.
You can just dive right into the console (Business Manager in their speak) and get to work implementing them.
Within the console, Salesforce offers 3 different redirect options:
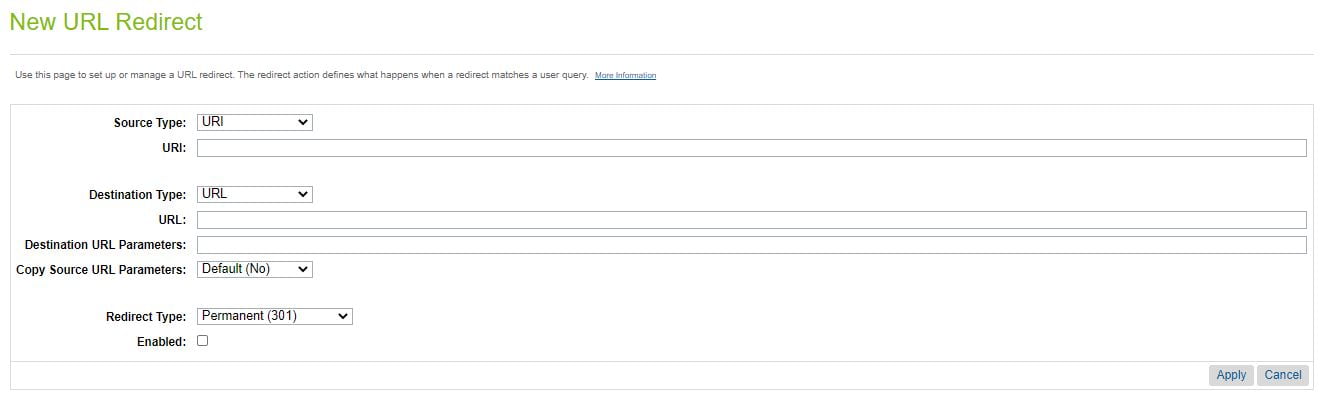
1. URL Redirects
These are the simplest redirects to implement with a little redirect builder tool and looks like the below:
However, they’re not perfect.
They’re really good for implementing the odd redirect. For example, if only one or two pages are changing. But if a large number of URLs are changing on your site then these won’t get the job done. Not unless you want to deal with a throbbing pain in your knuckles for the next month.
2. Static Mappings
This tends to be the go-to for large scale URL structure changes. It’s an empty box where you can just paste the redirects directly into it and looks like the below.

Static Mappings are the perfect option for any changes to category URL structure and static pages.
Where they let you down is if it is for a large amount of product page URL changes. For that, you probably want to use the third option. Dynamic Mapping.
3. Dynamic Mappings
Dynamic mappings are purely rule based. They come into their own when migrating a large quantity of products from one platform to the other. Especially when Salesforce by default adds .html to every product URL so you have no choice by to dynamically match the SKU to the new URL.
Just like the static mapping you can copy and paste the redirects directly into the console.

How to implement URL Redirects
As we mentioned earlier this is the simplest of the three to implement. All you have to do is fill in the fields.
There are three different fields that you need to fill in:
Source URI – This is the legacy URL that you want to redirect

Destination URL – The endpoint of the redirect

Parameter – Any URL parameters that you want to carry across
You can define these or you can copy them across from the referring URL

How to implement static mappings
Static mappings are a little more complex and the documentation from Salesforce isn’t the most user friendly. But once you’ve got the syntax and understand some of the terminologies it becomes pretty easy.
Below is the syntax from the documentation:
![]()
Let’s take a look at an example of mapping an old category page to the new version based on the above image.
Legacy URL: https://www.somesite.co.uk/chinos/navy-chinos
New URL: https://www.somesite.co.uk/trousers/chinos/navy-chinos
The Static Mapping You Would Put In Salesforce: /chinos/navy-chinos** i p,,,Search-Show,,cgid,navy-chinos
So lets breakdown what is going on here piece by piece versus what’s in the documentation.
<legacy URL> =/chinos/navy-chinos
Optional wildcard = **
Declare the redirect to be case insensitive [i] = i
Indicate which type of redirect = p
Note: With the above, there are two different types of pipeline call. Static which [s] and a dynamic call [p]. In the above example, we are calling a catalogue so it would be a dynamic pipeline call.
,<protocol>,<host>, = ,,,
The three commas are the space where the protocol and the host should be. In the original example, we are not changing the protocol (https://) or the host (somesite.co.uk) so we leave them the blank.
<pipeline>,<locale>,<parameter name>,<parameter value> = Search-Show,,cgid,navy-chinos
This states that it is a category (or catalogue in Salesforce), the space between the commas would be the locale, CGID is the parameter value which says to look for the Category ID and navy-chinos is the name of the Category ID.
If you are redirecting to a product page then the above changes and looks like:
Product-Show,,pid,<product id>
Putting it all together again
/chinos/navy-chinos** i p,,,Search-Show,,cgid,navy-chinos
So those are the building blocks for creating static mappings. If you want more details then visit the Salesforce Documentation here.
How to implement Dynamic Mappings in Salesforce Commerce Cloud
Now we’ve got URL Redirects and Static Mappings out the way we’re on to the final way to implement redirects in Salesforce Commerce Cloud. It also happens to be the hardest way. And the only real use case for is it is matching pages with a similar string at scale.
Which more often than not means SKUs.
So lets break down the pattern.

Legacy URL: /product/navy-chinos/skinny-fit-navy-chinos12345
New URL: /product/chinos/skinny-navy-chinos-12345.html
Example Dynamic Redirect: /product/**/** i p,,,Product-Show,,pid,{1}
You’ll notice that a lot of the building blocks from the static mappings are the same. So instead of going over all that again, we’ll quickly breakdown the redirect.
Declare the path you want to match: /product/**/**
The above is basically saying match any URL that sits within the /product/ folder.
Case insensitive and a dynamic redirect: i p
,<protocol>,<host>,: ,,,
<pipeline>,<locale>,<parameter name>,<parameter value>: Product-Show,,pid,{1}
The difference between this and previous static mapping is the parameter value at the end. The {1} is telling it to match the Product ID from the incoming URL. If those match then redirect it.
There are two different variations that you can use which can be found in the Salesforce’s documentation for Dynamic Mapping.
So there it is. A walkthrough of how to implement redirects in Salesforce Commerce Cloud.
Once you’ve got the basic syntax you can start to do these at scale as long as you have the legacy URL and Product/Category ID. Even building the logic out into a spreadsheet that will spit them out.
If you’re replatforming to Salesforce and have any questions around implementing the redirects then drop us a message on social media or in the comments below.