
There aren’t many tasks that are as thankless in SEO as a website migration or replatform. You’ve got everything to lose and usually not too much to gain.
It is also labour intensive, it requires little to no creativity, and by the end of it, you’ll be booking yourself an appointment at Specsavers because you’ve been staring so hard at spreadsheets.
That being said, it is so important to get it right.
If you get a site replatform wrong, then you’ll watch all of the SEO strength you’ve taken time building up quick disappear on your new site.
So with that said get your spectacles at the ready because we’re going to walk you through how to do a replatform.
If you don’t want to read on after this point and want to jump individual sections then use the links below:
What is a website replatform?
I guess before we get into the meat of walking you through it, we need to define what a website replatform or migration is.
In its simplest definition, it is switching from one system that a website is built on to another.
Unfortunately, that definition leaves a lot of room for interpretation and replatforming is a pretty broad church.
A site replatform to someone in IT can be something entirely different for a Product Manager or an SEO. It can include changing a selling system that powers the pricing and inventory on a site, to the CMS or even overhauling the whole site top to bottom.
Why replatforms are important?
There’s usually a reason you change something, right?
And that something is that the old platform that you were using wasn’t up to scratch. It probably had a whole heap of legacy issues that made it inflexible to work with. And there was probably something newer on the market that was a lot better suited to your current needs.
So it’s a good thing that you’re moving to a better tech stack. One that’s more flexible and performs better.
Yeah, it’s a lot of work, and it can be soul-destroying at times, but if you mitigate the risks properly, then it can set you up for success for the next 5 to 10 years.
Which brings us onto step 1.
An SEO guide to replatforming
Step 1: Understanding the risks
You need to know what is changing to know what the risks to SEO are and how to mitigate them.
There are 4 questions that I like to ask to gauge this:
Question 1: Are we changing the framework?
Here I’m asking whether we are changing the codebase. If so, we need to know which framework and factor in SEO recommendations based on that.
Question 2: Is onsite functionality changing?
This should establish whether the search functionality is changing. Helping to find out whether there is anything that you may need to block from crawlers and whether there’s potential for multiple URLs to be generated. All of which are pretty important for Organic SEO performance.
Question 3: Is the site structure changing?
If the answer is yes, it more than likely means that the URL structure is changing.
If the URL structure is changing, then you’ll have to map 301 redirects. And if the site architecture is changing, you need to make sure that where the pages sit on the site is optimal for ranking in Google and that all the relevant pages link to each other. Either that or risk your performance plummeting quicker than Tom Daley leaping off a highboard.
Question 4: Are we changing the page templates?
If templates are changing, then you will want to get your eyes on them. You’ve likely spent a lot of time optimising your current templates to rank in the SERPs. It’s also likely that there are changes that you wanted to make but couldn’t, it’s also important to factor those in as well. Remember there’s always room in a site replatform to sneak a few things in that you couldn’t previously do.
Once you’ve asked those 4 questions, you’ve got a top-level overview of what is changing and what you need to do.
After that, you need to start drawing up a plan.
Which brings us nicely onto Step 2.
Step 2: Define your must-haves and where you need sign-off
As the old ancient SEO proverb goes:
“Assume makes an ASS out of U and ME.”
Okay, maybe an SEO didn’t make that up, but if you make the assumption that whoever is in charge of the project is going to know everything that you require from an Search Engine Optimisation perspective then you are the proverbial ASS.
You need to define this to them.
This is your responsibility as a specialist in SEO.
This is even more important if you are working across multiple teams and with various agencies because managing stakeholders is incredibly hard for project managers.
To do this, we create an SEO requirements document. It doesn’t have to be any simpler than a spreadsheet with two tabs.
Tab 1 – Requirements
These are the things that we currently have that are essential to SEO performance. They absolutely have to be factored into the new platform.
We tend to split this tab into three sections:
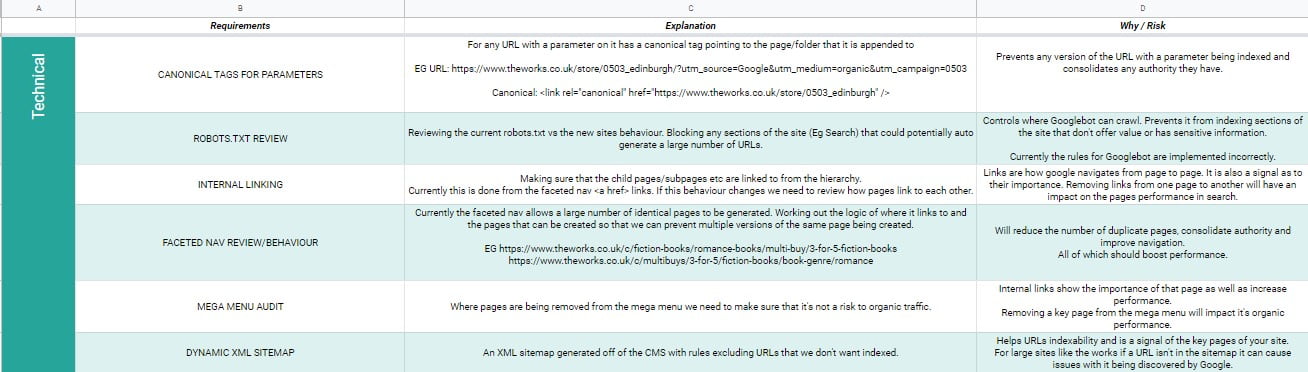
Technical SEO Requirements For Migration
All the technical SEO elements, with an explanation of each and the risk around them.
The above doesn’t have to be hyper-specific because you may not have the full picture yet. But you need to identify what’s essential and what you need to get signoff on.
Eventually, it will get to a point where it will look like the below.
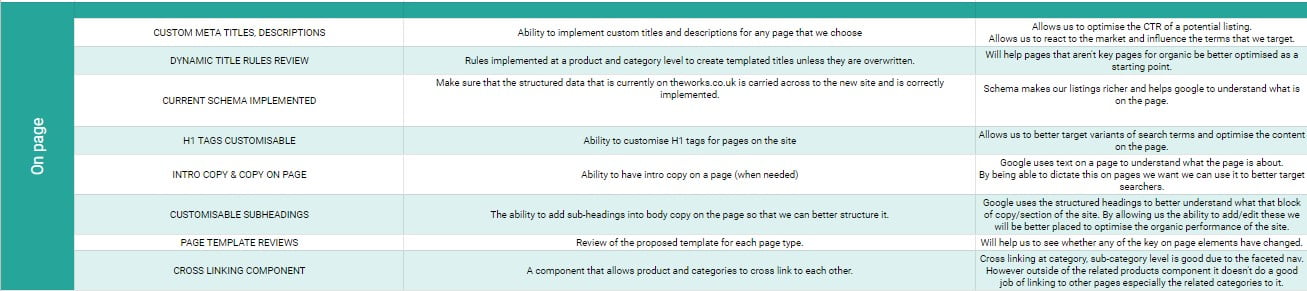
On page
This is the same premise as the above. You need to identify what are the key on-page SEO elements that you want in the new world. Then you need to articulate why. And finally, be clear about the risks around removing them.
Testing
The 3rd and final section of the 1st tab is to make sure that testing is factored in properly.
I cannot stress how important this is. Rushed decisions are bad decisions, and unless you’re bullish about this, you can be left with 48 hours to test a complete replatform.
So you need to make sure you clearly outline:
- How long is an adequate timeframe giving the size of the site and the proposed replatform.
- What testing environments you need access to and for how long.
- What tools you’ll need to use and any considerations around them being given access to the test environment
Tab 2 – Process
This tab is about being clear on your process and when that comes into play. This should help them to know where you fit in when they plan their design or development sprints.
You need to take all of the things that you’ve highlighted in Tab 1 and think about what you need for each.
So for example, for the On-Page requirements, you will probably need to feed into the wireframes, mock-ups and the final designs.
These would probably be separate tasks and would happen before they go live.
You’ll need to repeat this thought process for each until you have a process map built.
We like to split the process map into sections:
- Preparation – The things we need to do before we get to testing
- Testing – The things we need to do when testing the site
- Pre-launch – The things we need to get in place so we can measure whether it was a success or not
- Post-launch – Measuring and cleaning up if anything goes wrong (and there will be a cleanup).
Step 3: Doing the work
This is going to be wildly dependent on the type of replatform that you are doing. But because we can’t factor in every single kind of replatform, we will only cover some of the core things that continuously crop up as part of replatforms and how to approach them.
How to map redirects in a replatform
Yes, here it is. The silver medalist of mundane SEO tasks.
Oh, the spreadsheets.
Those URLs.
The sleepless nights fearing you’ve missed a part of the site.
Maybe that was too melodramatic, but because it is such high stakes, it’s a melting pot of stress and boredom which makes it one of the worst SEO tasks.
So, with the big sell out the way here is how you map redirects as part of a site replatform.
1. Crawl the current site pulling in as much data sources as possible
What you need to do here is gather as much data as possible and get a rough site structure.
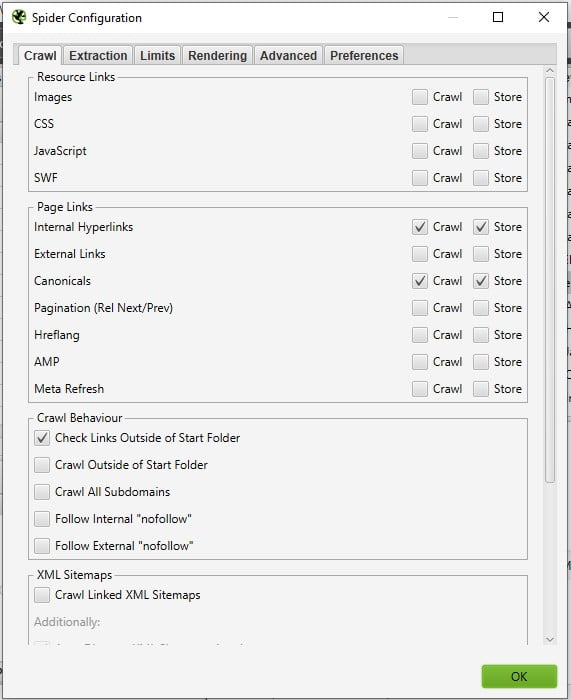
To do this, I use Screaming Frog and integrate it with Google Analytics API and Google Search Console API:
First, I make sure we are crawling it quickly, so to do that I uncheck the following options:
Configuration >> Spider >> Crawl
- Images
- CSS
- Javascript (NOTE: This depends on what framework your site is built off)
- External links
- Pagination
- Hreflang (Note: Only if there aren’t multination versions)
- AMP
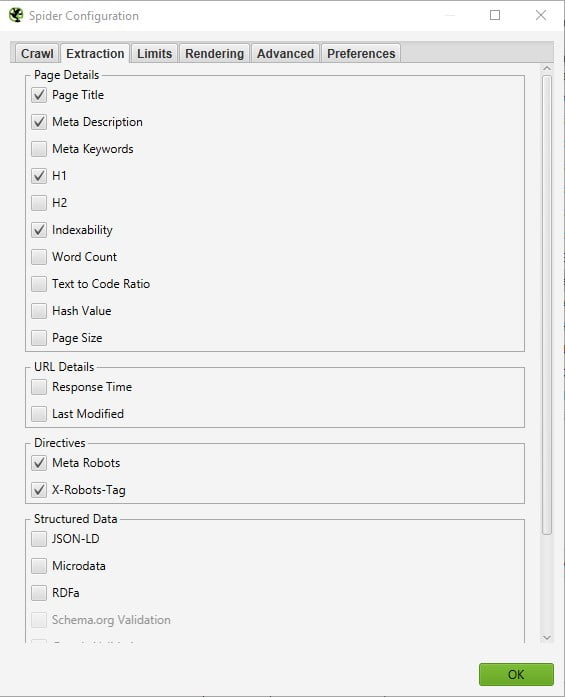
Configuration >> Spider >> Extraction
- Meta Keywords
- H2
- Wordcount
- Text to code ratio
- Hash value
- Page size
- Response time
- Last modified
- JSON-LD
- Microdata
- RDFa
Configuration >> Spider >>Rendering
For this, I leave it on text only. Again be careful to make sure that you’re not already on a SPA framework as this would be the wrong option for that.
After all those boxes have been unchecked, I will go to the robots.txt setting and uncheck the “show External URLs blocked by the robots.txt” box.
Hooking up the APIs
Then it’s about hooking up the APIs.
The reason we hook up the APIs to Screaming Frog is that it only discovers pages that are linked to. Now just because a page isn’t linked to on your site anymore doesn’t mean it’s not in the index.
That’s why we throw Sessions from GA into the mix as well as Impressions and Clicks from Search console.
By adding all of them, you’ve got a pretty healthy coverage of all URLs.
To connect the API, you take the following steps:
- Go to Configuration >> API Access
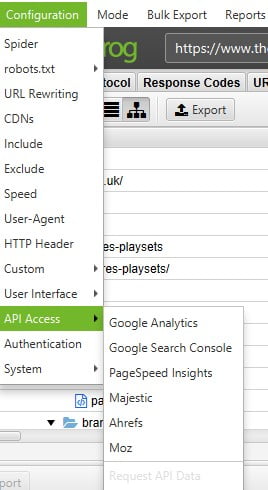
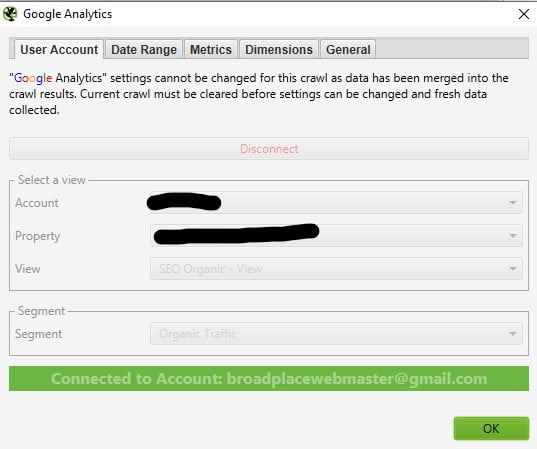
- Go to Google Analytics
- Click on or add the user account and connect
- Select the account you want to use
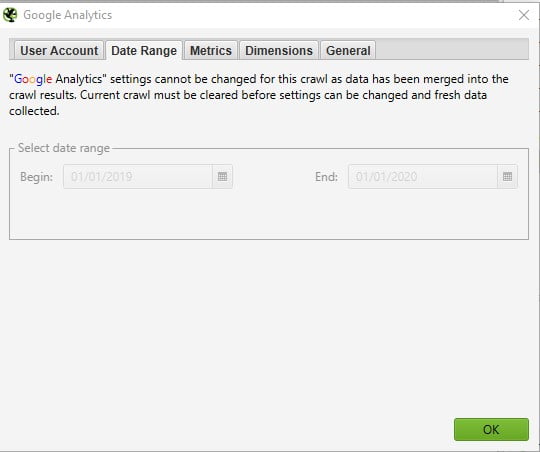
- Select the date range to give a reasonable amount of coverage (I usually opt for a year)
- Repeat for Google Search Console
Then once the above is done, run the crawl.
2. Save The Crawl
Once the crawl has finished, I like to save it. Mainly because I’m paranoid and I’ve been hurt one too many times in the past.
3. Switch The View To Tree Table & Export
Then I look to export that data into a spreadsheet. However, before I do that, I prefer to export it in the tree table view.
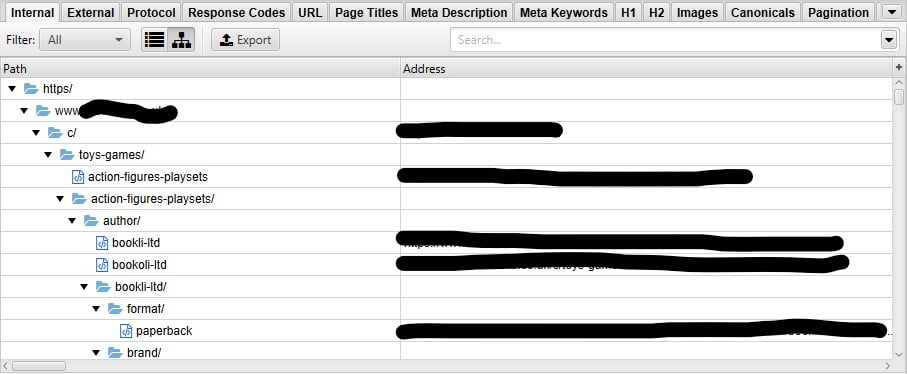
Now there’s a little trick to this to make sure all the folders are open. Hover over the top-level category, and right click then select “Expand all”.
If you don’t do that, then some pages won’t be in the export.
Once that is done we’ve got the majority of the URLs, actual stats to know which ones are important and an idea of structure. We’re ready to do the same for the new site.
4. Repeat the above on the test site
That’s right. You’ll have to go through all of that again on the test site.
5. Compare URL structures
What you’re looking for at this point is to compare the two sites side by side.
See where the structures have changed, what pages are missing, and where you need to implement a redirect.
This is where the real work gets done and depending on how different the URL structure is it can be a very manual process of going through it URL by URL.
How to audit pages template changes
This is quite simple; it’s just a case of looking at the proposed new template and comparing it to your current site.
The two most important thing to do in this phase are:
1) Make sure you are thinking about mobile 1st because Google’s index is based on the mobile version it crawls.
2) Ask loads of questions. I mean like loads. Don’t be afraid to be that person who’s always like; “So what does that do?” or “Where does that take you?” because the reality is that you are going to see the page in many forms. Some bare like wireframes. Some fully fleshed mock-ups. And by asking those questions early on, you get an idea of functionality, and you can stop any potential red flags that may cause issues for your Organic performance.
If you do the above and scrutinise every detail of each page, scrutinising where copy looks like it could be cut down, have any internal links been dropped or have features been added to the page then you won’t go too far wrong.
How to audit the main navigation
The main navigation of a site is always the most hotly debated topic of any replatform.
It’s almost like a proxy war between the departments.
Product and sales teams want more pages in it.
UX want no pages in it.
Merchandisers want messaging all over it.
It’s almost a never-ending battle. But from an SEO’s point of view, you want to make sure that the crucial pages are in it and that one’s that are doing nothing aren’t.
To find this out, you need data.
Now it’s quite a long process, so I’m going to jot down the crib note version:
- Pull the URLs from the main nav
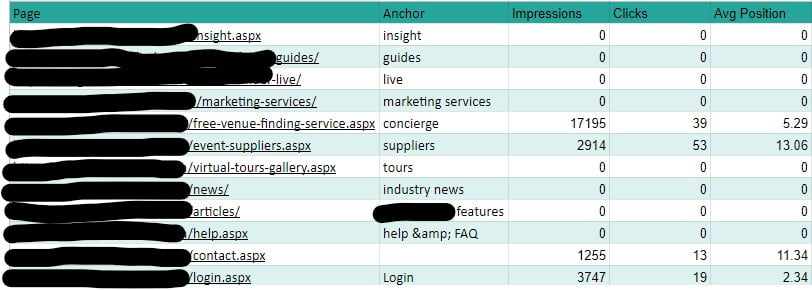
- Crawl the site and look at the current total number of links into them
- Take the total impressions, clicks and Avg Position for them
Then start having some fun with maths. I tend to look at the following:
=impressions/total links
The higher the number, the better. It means the page has high traffic potential.
Then do the same with clicks, which shows the pages acquiring the most traffic.
You can also take other pages that aren’t in the nav and do the same. And then multiply them by the Avg position. This will identify underperforming URLs with high traffic potential.
And just to make it entertaining for yourself you can give them stupid names so you have a spreadsheet that looks a little like the below:
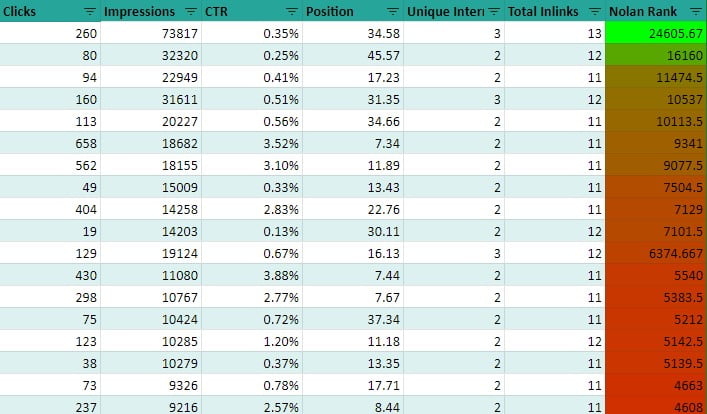
Then it’s taking all that data and making a logical decision based upon it.
Step 4: Testing
Now, is the part of the process where you make sure everything has been implemented properly.
The most important things to test are below:
- That key content on landing pages hasn’t been lost
- That pages can still be navigated to from one to the other
- That you test the components, site searches, faceted navs and booking flows thoroughly.
- Check the key technical elements are all still there Eg canonicals, redirect rules, schema etc
- Check all the redirects that were mapped were implemented.
If you want a more thorough checklist, we’ve embedded one below.
Website Migration SEO Checklist 2020
Preparation
Site structure:
- MAP EXISTING SITE; Finding every URL that is currently on the site and indexable. Mapping this into a clear site structure so that it can be cross-referenced versus the proposed new site structure to see where pages are being removed and where redirects need to be implemented.
- PROPOSED SITEMAP REVIEW; A sitemap of the proposed new site. If applicable this needs to include the new URL structure.
- PROPOSED SITEMAP REVIEW; Comparison of the existing sitemap Vs the new sitemap to see which pages are being dropped, the risk around them and to get an idea of the number of redirects that need to be mapped. Also, any potential pages/page types that currently do not exist but that have the potential to drive additional traffic.
- TITLES, H1S, DESCRIPTION MAPPING; Map of the Page Titles, H1s and Descriptions for the proposed new site.
Functionality Review:
- WALKTHROUGH OF THE USER JOURNEY; A walkthrough of how the site will work as well as core functionality. The goal of this is to identify any functionality that may affect the way that Googlebot crawls and indexes the site. Things to look out for:
– How the search functionality will work and what string that generates
– How filtering works
– The booking flow and whether the URL changes
– Can pages be auto-generated
- ACCESS TO THE SANDBOX/ DEV ENVIRONMENT; Following the walkthrough of the user journey it would be good to have access to the site to double-check there are no things functionally that may cause an issue for SEO.
The goal here is to make sure there isn’t anything that we need to fix at the 11th hour.
Technical Requirements
- SCHEMA REVIEW & RECOMMENDATIONS; supply a list of the current structured data that is on the site mapped to the page types that it is implemented on.
Also, supply a list of additional structured data opportunities for review. - XML SITEMAP; Supply guidelines on how to format the XML sitemap as well as pages that shouldn’t be included within it.
- ROBOTS.TXT; Based on the functionality walkthrough and access to the sandbox/development environment, make a list of recommendations to be implemented for updating the robots.txt.
This will mainly be looking at how any URL strings generated from the new search functionality have changed and then editing the robots.txt to make sure they are blocked.
On-Page
- PAGE TEMPLATES SUPPLIED; Each version (mobile and desktop) of the page templates to be supplied to {agency/in house team} to be reviewed.
- PAGE TEMPLATES REVIEW; Agency/In house team to review each page template supplied.
The goal of this is to identify any key components that are being lost from the old version of the site as well as being able to ask key questions about how certain features of the page behave. - TEMPLATE FEEDBACK; Agency/In house team to feedback on each template with risks of features missing as well as any other components that may be beneficial.
Mapping
- ACCESS TO THE TEST SITE; Agency/In house team and it’s tools to get access to the test site to start mapping the page to page redirects.
- REDIRECT MAPPING; Map of the page to page redirects that need to be implemented.
- MAP & TITLE’S, H1’S AND DESCRIPTIONS NEW SITE; Map the Titles, H1s and Descriptions for the new version of the site.
- IMPLEMENT REDIRECTS; Page to page redirects to implemented as per the proposed map.
- IMPLEMENT TITLES, H1’S & DESCRIPTION; Implementing Titles, H1’s and Descriptions.
Testing
Pre Go Live Testing
- REDIRECT TEST; Test all the page to page redirects to make sure that they have been implemented correctly.
- TITLES, H1S & DESCRIPTION; Run a crawl comparing proposed titles, desc, h1s and titles, desc, h1s currently on the test site. The goal is to identify any titles that aren’t implemented correctly.
- PAGE TEMPLATE TEST; Testing the built page templates. The goal is to identify where the expected behaviour from the design differ to the test site. Also to review the test version against the current live version.
- FUNCTIONALITY TESTING; Testing the behaviour of on-site functionality looking for any issues with the fully developed version versus what was expected.
- FIXES IMPLEMENTED; Agreed upon fixes from any issues raised from the above testing.
Pre Go Live
Benchmarking
- PULL RANKING DATA; Pull ranking data from last year as well as a previous 4 weeks to benchmark go-live performance against it.
- BENCHMARK PAGESPEED; Benchmark the pagespeed of the current site.
- BENCHMARK ERRORS; Keep a log of historical errors on the site for comparison.
- TOP LEVEL DASHBOARD GSC; Build a top-level dashboard in data studio to measure avg position, clicks, impressions and sessions over time.
- B
Launch & Post Go Live
Crawling
- CRAWL ALL THE REDIRECTS; Crawl all the redirects that have been mapped. Identify any difference in behaviour from the test site to the live site
- CRAWL SITE; Crawl the site to make sure there aren’t any major issues with indexability, on-page elements, structured data etc
- FIXES; Any major issues highlighted to be fixed.
GSC
- FETCH THE HOMEPAGE; Fetch the homepage in Google Search Console
- UPLOAD SITEMAPS; Upload the XML sitemap URLs if they have changed.
Monitor And Cleanup
- MONITOR PERFORMANCE; Look for pages that have massively dropped in rankings and then compare where/how they have changed versus previous versions
- MONITOR ERRORS; Monitor GSC for any increase in errors or pages missed from the redirect. Fix accordingly.
- INDEXATION ISSUES; Monitor GSC for URLs that are incorrectly being indexed or different canonicals being chosen.
- FIXES; Implement fixes for any issues highlighted above.
So there it is a guide to planning for a replatform. If you follow the above steps, you should be in a good place when it comes to the go-live date.
If there are any questions around it, then you can hit me up on twitter or leave a comment on the blog.