In today’s data-driven marketing landscape, understanding the precise impact of your advertising efforts is crucial.
For businesses that rely on Google Ads to drive online sales, configuring enhanced revenue tracking can be a game-changer. By accurately tracking conversions and attributing them to the correct ad campaigns, you can optimise your ad spend, improve ROI, and make informed decisions based on actual revenue data.
In this comprehensive guide, we’ll walk you through the benefits of enhanced revenue tracking, how it differs from standard conversion tracking, and the step-by-step process to set it up for your Google Ads campaigns.
The Importance of Enhanced Revenue Tracking
Before diving into the setup process, it’s worth exploring why enhanced revenue tracking is so valuable for your business.
1. Accurate ROI Measurement
Enhanced revenue tracking allows you to measure the exact revenue generated by your ad campaigns, not just the number of conversions. This means you can calculate your return on investment (ROI) with greater accuracy, allowing you to allocate your budget more effectively.
![]()
2. Improved Campaign Optimisations
With enhanced revenue tracking, you gain insights into which keywords, ads, and audiences drive the most revenue, not just the most conversions. This enables you to optimise your campaigns based on profitability rather than volume alone.
This is very beneficial if you are a business that has a fluctuating AOV. In this case, conversion volume doesn’t necessarily mean strong revenue. As a result, understanding what areas of your Google Ads account are driving actual revenue will allow you to make better optimisations.
3. Enhanced Attribution Models
By tracking revenue more accurately, enhanced tracking improves your ability to use data-driven attribution models in Google Ads. This means better insights into the customer journey and more informed decisions about where to utilise your investment.
As well as this you can effectively use Google Ads’ most effective bid strategies, such as target returned on ads spend (ROAS), as your account will have the required data that Google’s algorithms need to bid for your desired ROAS.
Key Differences
- Standard Conversion Tracking: Measures the number of conversions without considering their monetary value.
- Enhanced Revenue Tracking: Tracks the actual revenue generated by each conversion, providing deeper insights into the financial impact of your campaigns.
Steps to Configure Enhanced Revenue Tracking in Google Ads
Now that we’ve covered the benefits, let’s get into the practical steps of setting up enhanced revenue tracking for your Google Ads account.
1. Enable Conversion Tracking in Google Ads
Before you can set up enhanced revenue tracking, you need to have standard conversion tracking enabled in your Google Ads account.
Thankfully, it’s nice and simple for you to configure this:
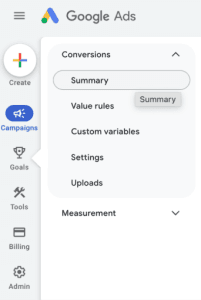
- Step 1: Log into your Google Ads account and navigate to the “Goals” menu on the left-hand side.
- Step 2. Under “Conversions,” select “Summary.”
- Step 3. Click the blue button called “Create conversion action” to create a new conversion.
2. Create a Revenue-Based Conversion Action
To track revenue, you’ll need to create a conversion action that records the monetary value of each transaction.
1. In the “New Conversion Action” you just created, choose “Website” as the type of conversion.
2. Specify the conversion action as a purchase or sale.
3. Under “Value,” select “Use different values for each conversion” and ensure your eCommerce platform or website is set up to pass transaction values back to Google Ads.
3. Implement Conversion Tracking Tag on Your Website
The Next Step is to ensure that the conversion tracking tag on your website is capable of passing back revenue data to Google Ads.
1. Access your website’s code or tag management system (we suggest using Google Tag Manager).
2. Add the Google Ads conversion tracking tag to the purchase confirmation page or any other page that signifies a completed transaction.
3. Make sure the tag is configured to capture the transaction value and pass it to Google Ads.
Technical Tip: If you’re using Google Tag Manager, you can set up a variable to capture the transcation from your eCommerce platform and include it in the conversion tracking tag.
![]()
4. Integrate Google Ads with Your eCommerce Platform
To automatically pass the transaction data (include revenue) to Google Ads, you can integrate your eCommerce platform with your Google Ads account:
1. If you’re using a popular eCommerce platform like Shopify, WooCommerce, or Magneto, look for a Google Ads integration or plugin.
2. Follow the platform-specific instructions to link your store to Google Ads.
3. Test the integration to ensure that transaction data, including revenue, is being accurately recorded.
5. Enable Enhanced Conversions
Enhanced Conversions is a Google Ads feature that uses first-party data to improve the accuracy of conversion measurement.
When a customer completes a purchase, their data (e.g., email, phone number) is hashed and sent to Google Ads, where it’s matched against Google’s data to improve attribution. To configure this:
1. In the Google Ads interface, go to “Goals” > “Conversions.”
2. Select the conversion action you created earlier.
3. Scroll to “Enhanced Conversions” and toggle it on.
4. Follow the prompts to set up enhanced conversions, ensuring your website’s data layer or tag is configured to collect and send the required data.
This is what will take your standard eCommerce revenue tracking to enhanced revenue tracking so it’s important to do this step correctly.
6. Verify and Test Your Setup
Once you’ve configured enhanced revenue tracking, it’s essential to check that everything is working correctly. A great way to quickly and easily test this is:
1. Use Google Tag Assistant or a similar tool to test your conversion tracking tags and ensure they’re firing correctly.
2. Check the Google Ads interface to confirm that revenue data is being recorded accurately.
3. Run a test transaction on your website using a dummy product and verify that the correct revenue amount is reported in Google Ads.
If everything is working correctly you should see a dynamic value next to your conversion indicating the specific revenue for that transaction is being recorded accurately:
Test Transaction 1

Test Transaction 2
![]()
7. Analyse and Optimise Your Campaigns
With enhanced revenue tracking in place, you can now dive into your campaign data to start optimising based on revenue, not just conversions.
1. Navigate to the “Campaigns” or “Keywords” tab in Google Ads.
2. Use the “Columns” option to add the “Conversion value” metric to your reports.
3. Analyse which campaigns, ad groups, or keywords are driving the most revenue and adjust your bids, budgets, and targeting accordingly.
8. Leverage Smart Bidding Strategies
Google’s Smart Bidding strategies, such as Target ROAS (Return on Ad Spend), are designed to optimise your bids based on the revenue generated by your ads. With enhanced revenue tracking, you can fully leverage these strategies to maximise profitability.
For best results when moving a campaign to target ROAS, you will need an existing pool of data so that Google can have context around AOV, conversion rate, and CPC’s. Google will use all of this data when bidding to deliver as close to the target ROAS as you set.
There is no definitive answer on the actual number of conversions you need before you can effectively move campaigns to target ROAS bidding however from our experience between 20-30 conversions on a campaign in a month is the ideal amount.
To change your campaign bid strategy:
1. In the Google Ads interface, go to the “Campaigns” tab.
2. Select the campaign you want to optimise and click “Settings.”
3. Under “Bidding,” select “Target ROAS” as your bidding strategy.
4. Set a target ROAS based on your business goals and let Google’s machine learning algorithms do the rest.

Conclusion
Enhanced revenue tracking is a powerful tool for any business looking to get the most out of their Google Ads campaigns.
By accurately tracking the revenue generated by your ads, you can make data-driven decisions that lead to better ROI, more effective ad spend, and ultimately, increased profitability. Whether you’re a seasoned marketer or just getting started with Google Ads, configuring enhanced revenue tracking should be a top priority.
If you’re not already using enhanced revenue tracking, now is the time to set it up and start reaping the benefits. With the steps outlined in this guide, you’ll be well on your way to optimising your campaigns for maximum revenue and growth.