Creating Google Ad campaigns in the interface can be an absolute pain in the backside. You can easily miss out on crucial steps, misspell ad copy or even forget critical negative keywords that could skew your overall results.
Lucky for us, Google Ads editor makes life a lot easier when making bulk changes.
But despite it being a lot easier to use, it can still feel overwhelming when you get started. Especially if you’re new to Google Ads.
In this post, we’ll be providing you with some quick tips and our favourite Google Ads editor templates.
These will allow you to use the tool more efficiently, remove potential errors in campaign builds, and improve your overall account structure.
Some Quick Google Ads Editor Tips
Before we dive into the templates we need to cover a few key things:
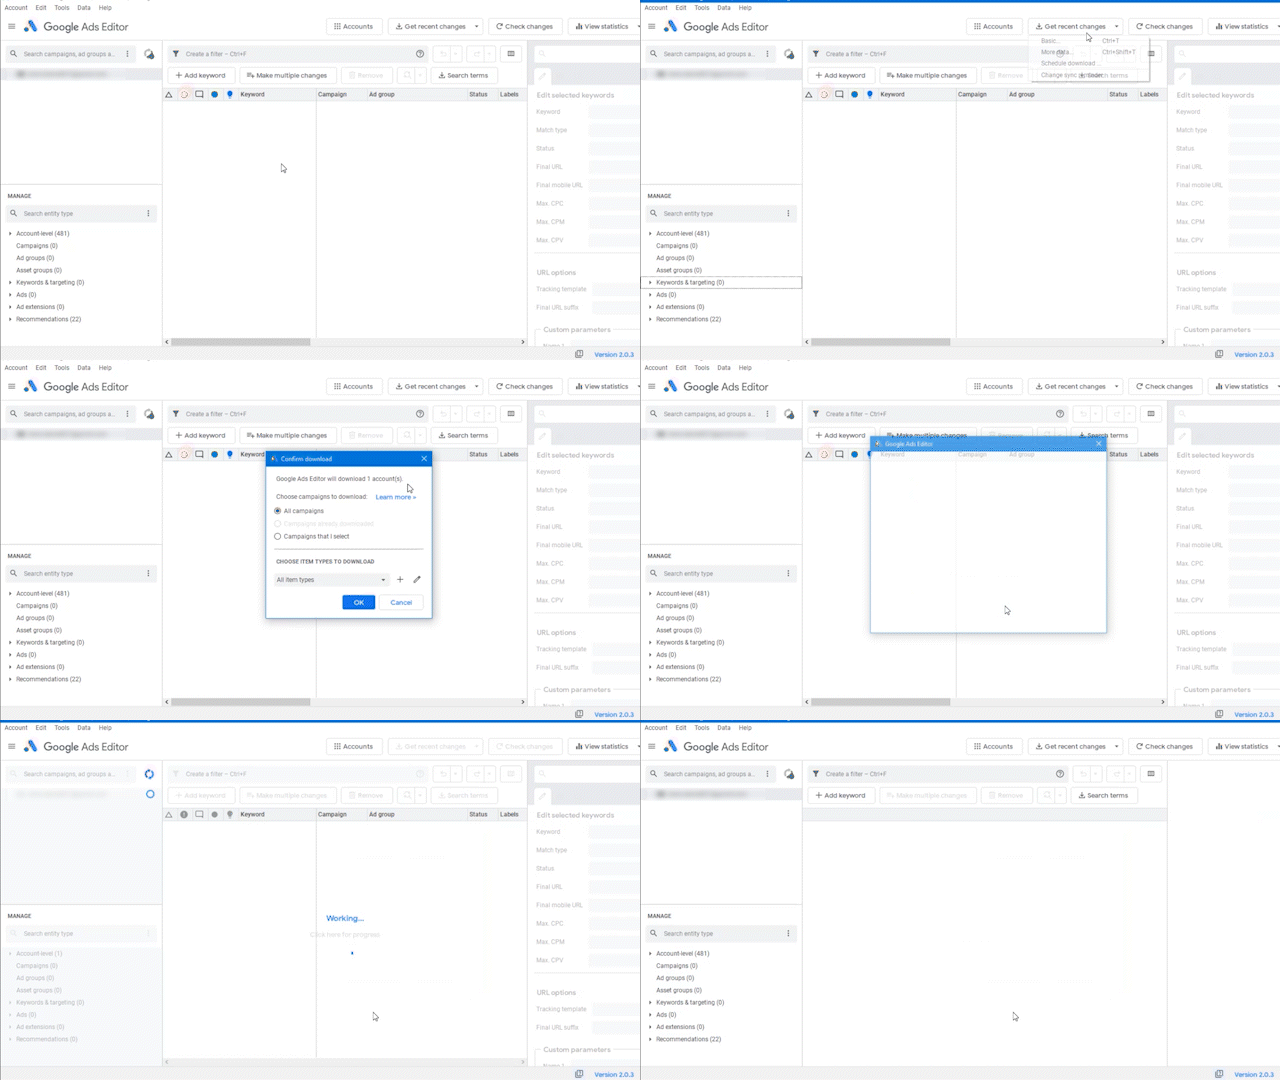
- Always get recent changes – This downloads the latest changes in your account in the editor and allows you to always work off the latest version of your account:
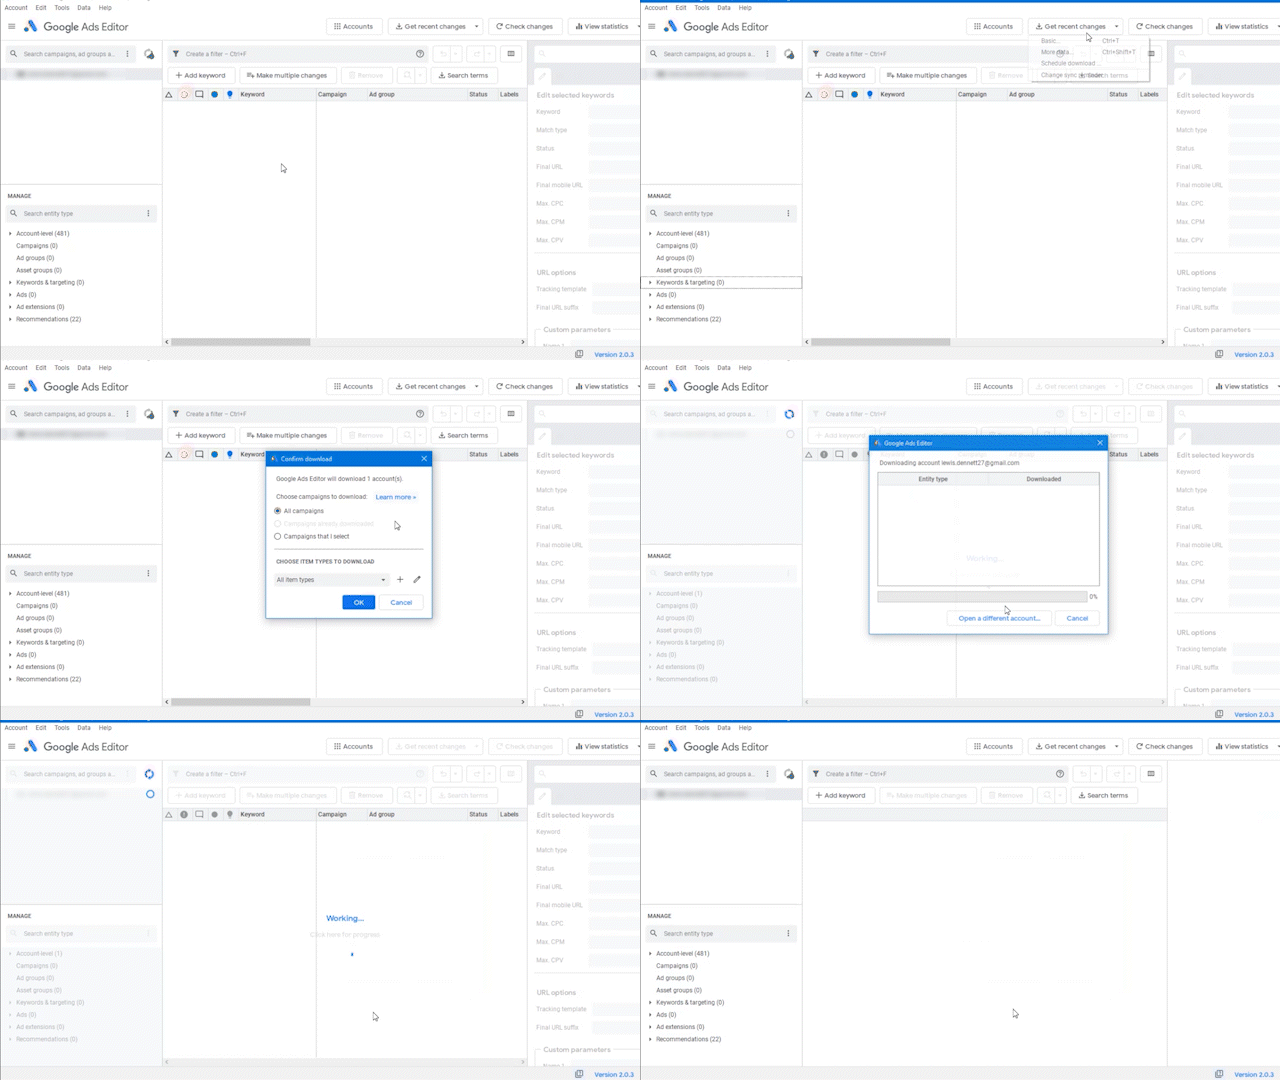
- Always check changes – Similarly to getting recent changes, it’s crucial to use the ‘Check Changes’ feature before you post your changes. This will automatically scan your account for any errors within your upload that would cause disapproval:
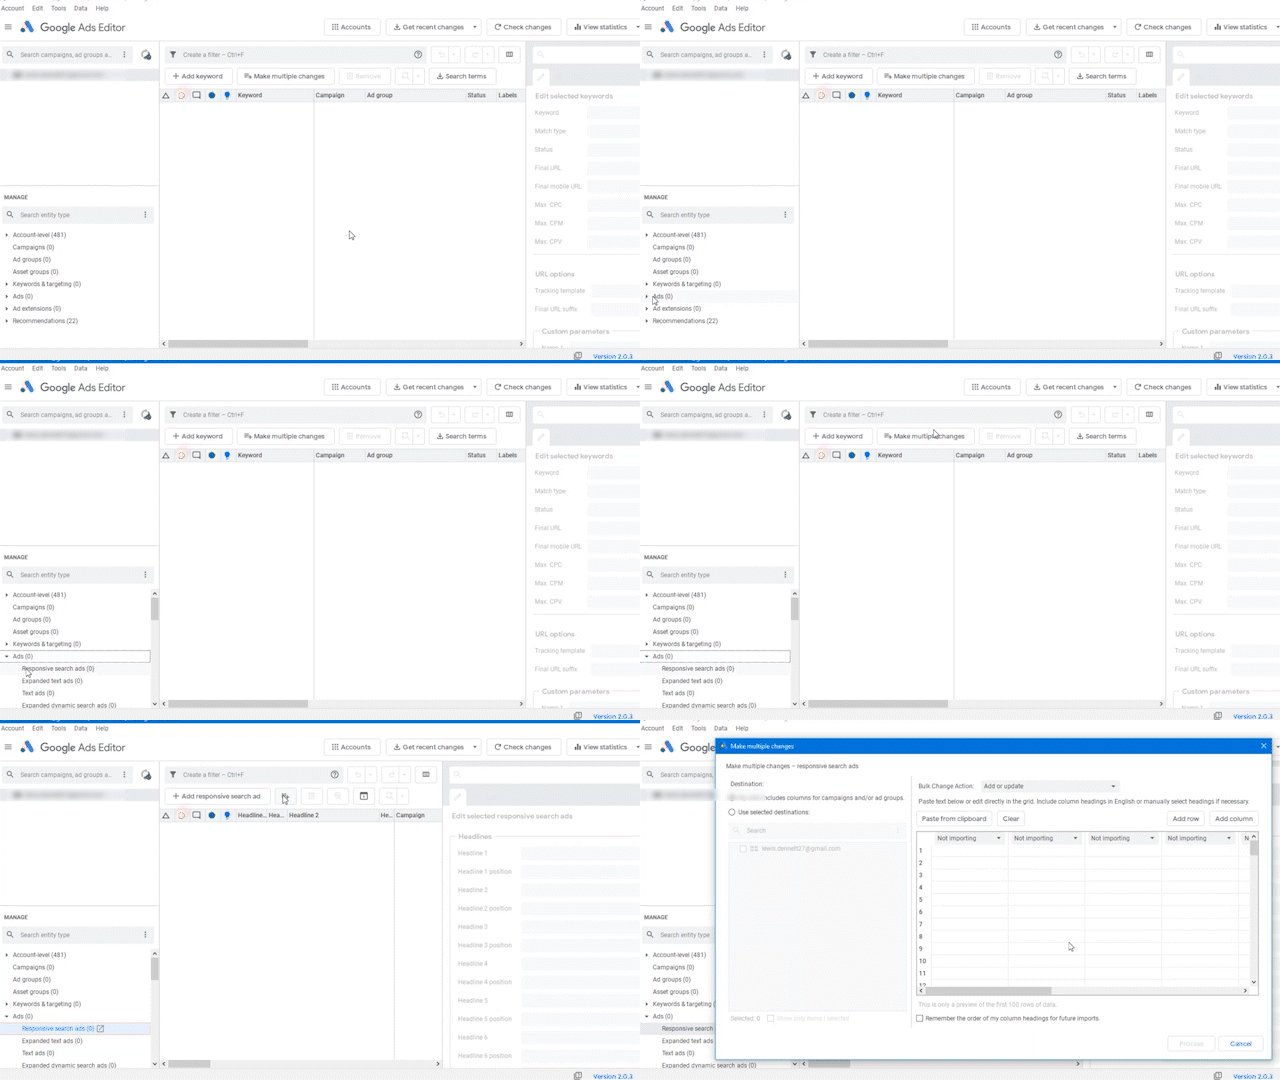
- Finding ‘make multiple changes’ -The ‘make multiple changes’ feature can be tricky to find if you’re unfamiliar with the interface. To find it, simply select the section in which you want to make multiple changes and select the ‘Make Multiple Changes’ button:
For other more in-depth instructions or additional tips on the editor, this resource from Google is great if you’re just starting out: Google Ads Editor Help
Keyword Template
Key Template Features
- Automatic ad group structuring & naming
- Ability to apply and keeps tabs on the match type and CPC
- Headline generator for ad copy
The majority of all PPC strategies begin or at least utilise a Search campaign to some extent. And at the very heart of every Search campaign strategy are keywords.
Keywords are notoriously bulky and difficult to manage within the Google Ads interface, especially if you have very large lists. It’s easy to lose track of what’s already been added and create duplicates or even ad groups with no keywords.
The solution to this problem is our handy Keyword Template:

This template allows you to carefully categorise your Keywords by automatically creating an Ad Group using the Keyword and Match Type. This will not only improve your Campaign management and structuring but help with reporting and day-to-day management of your activity.
Here is how the template looks in action with your data added:

Once you paste your keyword list into the keyword column, the formulas within the template will create your Ad Group name and basic campaign structure. The only additional information you have to provide is the match type you want to use and the max CPC (cost per click) you want to apply to the keyword.
Once you’ve implemented that, match the Criterion Type to the Match Modifier. For example, if you’re using Phrase Match, the match Modifier should read _PHRASE. Then you’re ready to upload.
How To Upload:
- Copy all of the data up to column E (Max CPC)
- Load up the editor and, navigate to the keywords & targeting drop-down and select keyword
- Select make multiple changes
- Once the window pops up, select your destination as ‘my data includes columns’ for campaigns and/or ad groups
- Then in the spreadsheet window, paste your data and ensure the columns at the top don’t say ‘not importing’. If they say ‘not importing’ press the drop-down and select the correct heading
- Once done, hit ‘process’ and review your changes. You should see the correct number of ad groups and keywords in the preview section. Once reviewed, press ‘Finish and ‘review changes’
- Then click ‘Keep’ at the top of the editor where it says ‘Review changes’
If done correctly, you will see your new Campaign, Ad Groups and Keywords within your account ready.
All you have to do now before you can post is give your campaign a budget, then select the ‘Default Max CPC’ at an Ad Group level.
You’ll then have a complete Keyword build like so:
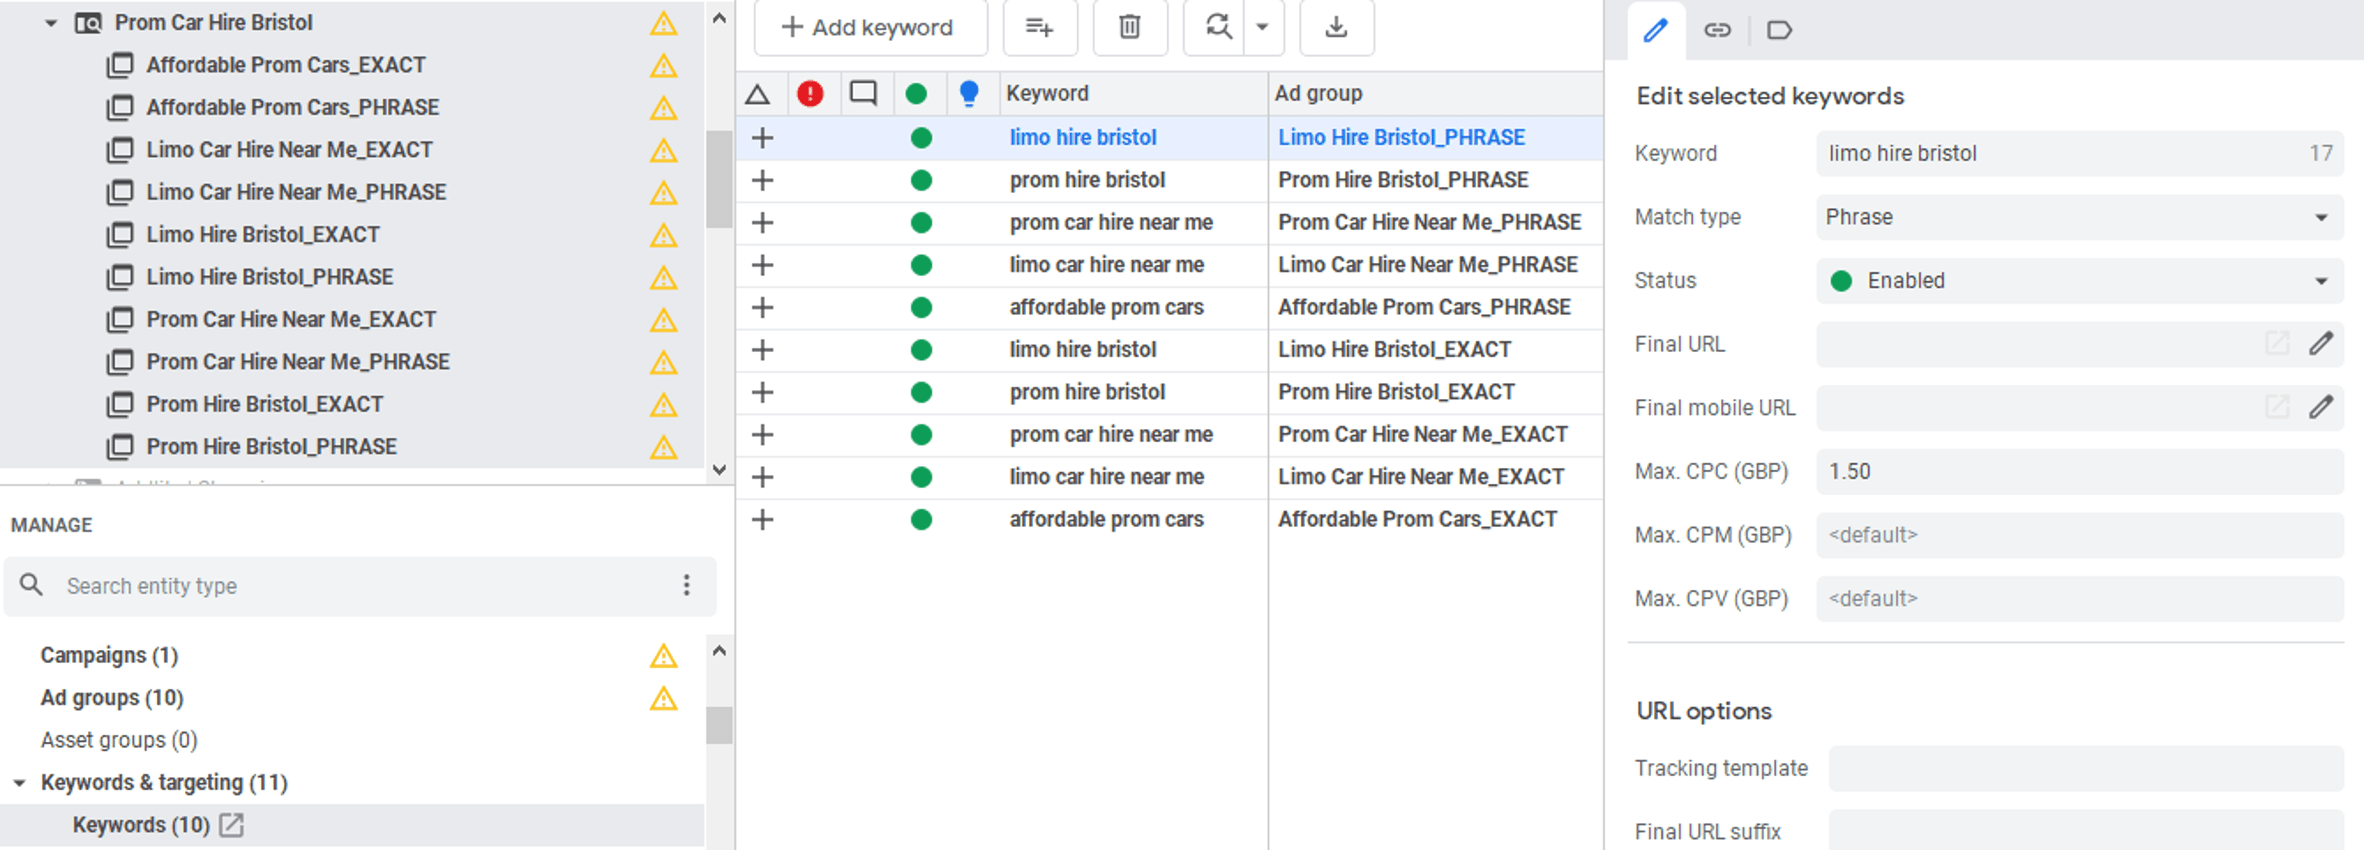
You can download the Google Ads Editor Keyword Builder Templates below:
- Google Ads Editor Keyword Template
Negative Keyword Template
Key Template Features
- Campaign and ad group level template
- Easily keep track of keyword match types
- Can post straight into the editor
Now you’ve uploaded Keywords, what about the flip side of that. Negative Keywords.
Negative Keywords are a great way to optimise your performance by blocking search terms that may trigger your ads but are not relevant or don’t have the correct intent. These are great ways of saving budget, reducing conversion costs, and increasing ROI.
There are two main ways to upload negative keywords.
At an Ad Group level or a Campaign level.
We’ll start at the top with the Campaign level, as this is very easy to do and does not require a complicated template.
You only need 3 columns:

All you have to do to complete the template is paste in your Campaign name, your keyword list and the criterion type you want to add to the negative keyword.
Once you’ve pasted this information into the template, follow the following steps to upload:
How To Upload:
- Copy all of the data in the template (Columns A-C)
- Load up the editor, navigate to the keywords & targeting drop-down and select ‘Keyword, Negative’
- Select make multiple changes
- Once the window pops up, select your destination as ‘my data includes columns for campaigns and/or ad groups’. This time on the additional selection option, select ‘Add as Campaign-level negative keywords’
- Then in the spreadsheet window, paste your data and ensure the columns at the top match the template and don’t say ‘not importing’ if they say this, press the drop-down and select the correct heading
- Once done, hit the process and review your changes. You should see the campaign and the list of keywords with their relevant match types in the preview section. Once reviewed, press ‘Finish and review changes’
- Then click ‘Keep’ at the top of the editor where it says ‘Review changes’
If you’ve followed the above steps correctly, you will see your Campaign level Keywords within the Keywords Negative section of the editor:

As mentioned above, you can also get more granular with your Negative Keywords and upload them at an Ad Group level.
The template works much the same, except this time, you have an Ad Group column. This tells the editor that the Keyword Negative is only uploaded into that specific Ad Group.
When entering your data into the template, simply paste the Campaign Names and Ad Groups you want to add the Negatives to and match the keyword to the relevant Ad Group like so:

How To Upload:
- Copy all of the data in the template (Columns A-D)
- Load up the editor and navigate to the ‘Keywords & targeting’ drop-down, and select ‘Keyword, Negative’
- Select ‘Make multiple changes’
- Once the window pops up, select your destination as ‘my data includes columns for campaigns and/or ad groups’ but this time, on the additional selection option, also select ‘Add as ad group-level negative keywords’
- Then in the spreadsheet window, paste your data and ensure the columns at the top match the template and don’t say ‘not importing’. If they say this, press the drop-down and select the correct heading
- Once done, hit the process and review your changes. You should see the number of Negative Keywords you have added in the preview section. Once reviewed, press ‘Finish and review changes’
- Then click ‘Keep’ at the top of the editor where it says ‘Review changes’
If you’ve followed the above steps correctly, you will see your Ad Group level Keywords within the specific Ad Group Keywords Negative section of the editor.
You can check they have uploaded at an Ad Group level by checking the Ad group column like below:

You can download the Google Ads Editor Negative Keyword Builder Templates below:
- Campaign & Ad Group Level Negative Keyword Template
Responsive Search Ad Template
Key Template Features
- Allows you to add all 15 headlines
- Automatically character counts your copy
- Allows you to pin headlines and descriptions in certain positions
You’ve got Ad Groups, you’ve got Keywords, and you’ve got Negative Keywords. The last piece of the puzzle is some ads.
Search ads are the main form of Ads that you can upload in bulk on the Google Ads editor. This includes Responsive Search Ads (RSA’s).
I hope that you already know what an RSA is and how it works, but if you don’t, a quick summary is that it takes a variety of ad copy you provide and tests and rotates different variations to find what delivers the best results.
The key information you need to provide is listed below:
- Up to 15 headlines
- Headline positions which will only show the headline in the position you set (1,2 or 3)
- Up to 4 descriptions
- Description positions which will only show the description in the position you set it (1 or 2)
- URL path 1 and path 2
- Final URL (landing page)
Just like our Keyword templates, the main structure remains the same. You paste the Campaign name you want to add the ads to in the Campaign column and then add all of the Ad Groups you wish to add the RSAs to.
RSAs don’t work at a Campaign level, so you have to implement both the Campaign name and Ad Group name.
Once you’ve pasted all of the Ad Groups, you want to create ads to begin adding as many headlines and descriptions as you can.
You don’t have to add 15 headlines and 4 descriptions, but the more you provide, the better your ad quality will be.
It’s also worth noting you don’t have to give headlines or descriptions a position, but if you feel it would work better in positions 1,2 or 3, feel free to apply that for your ads.
You also are only allowed a maximum of 30 characters for headlines and 90 characters for descriptions, but luckily for you, we have a formula within the template that tells you how many characters each piece of ad copy is so you know your copy meets the requirements before you upload.
Just remember to delete these columns before you plaid as they will not import into Google Ads:
Top Tip: Make sure to apply at least 5 headlines and at least 3 descriptions. Apply both path parameters and a final URL.
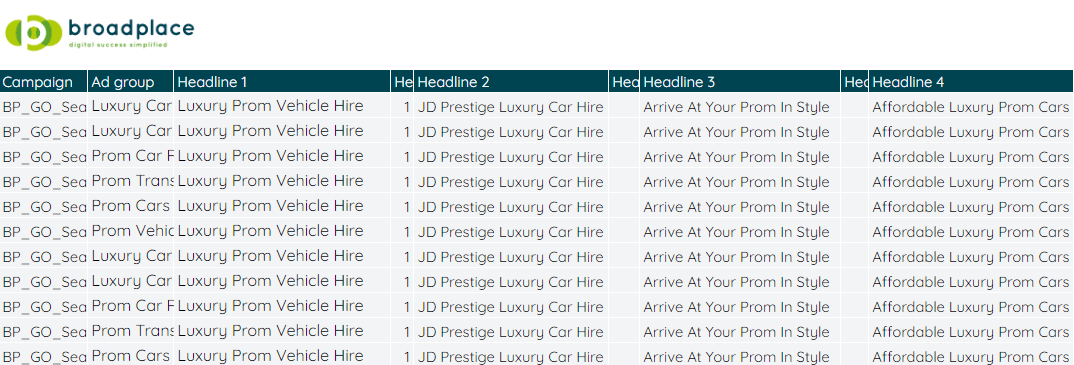
Once done, your template should look something like this and will be ready to upload:
How To Upload:
- Copy all of the data in the template but remember to delete the ‘length’ columns before you copy the data
- Load up the editor and navigate to the ‘Ads’ drop-down and select ‘Responsive search ads’
- Select ‘Make multiple changes’
- Once the window pops up select your destination as ‘my data includes columns for campaigns and/or ad groups’
- Then in the spreadsheet window paste your data and ensure the columns at the top match the template and don’t say ‘not importing’ if they say this press the drop-down and select the correct heading. Make sure your scroll to the right and check every heading as the RSA template has many columns
- Once done, hit the process and review your changes. You should see the number of RSAs you have added in the preview section. Once reviewed press ‘Finish and review changes’
- Then click ‘Keep’ at the top of the editor where it says ‘Review changes’
You’ll then be able to view your ads at a campaign or ad group level by either selecting the Campaign (to see all the ads) or the Ad Group (to see specific Ad Group Ads) within the RSA section:

You can download the Google Ads Editor RSA Builder Template below:
- Responsive Search Ad Template
Extensions
Key Template Features
- Sitelink Template
- Callout Extensions Template
- Structured Snippets
A great way to take your ads to the next level using Google Ads is by utilising ad extensions.
These features enhance your ads using elements like bullet point callouts and specific product prices with dedicated landing pages and images. This means you have created a lot of ads it can be quite difficult to add these in bulk.
Our template allows you to easily add Sitelinks, callout extensions and structured snippets. These 3 extensions are all text-based, which allows you to easily create and upload them in bulk using our template.
You can then associate these to an ad group or campaign level to either link them with specific ads or a campaign as a whole. They all work relatively similarly, but each requires a few different text implementations to allow them to be approved.
Sitelinks
Let’s start with what Sitelinks are. These are groupings of links from your domain that you may want to present users with on your ad to help increase CTR. These could be links to your about us page, contact us page or specific product categories.
You simply provide the link and some text to name and explain the purpose of this page. You then fill this information out in the template and map out all of your key sitelink extensions ready to be uploaded.

Callout
Callout extensions are just a few words that help promote special offers to customers, such as free delivery, sale now on, contact us etc.
These allow you to push a few more CTA’s that may not fit into your ad copy.
Fill out the template like the below example, and you’ll be ready to upload and enhance your ads in no time.
You can also set start and end dates within the template, which are great for scheduling promotion callout extensions that reference time-sensitive events.
You can also leave these blank to allow them to run permanently if you prefer.

Structured Snippets
Finally, Structured Snippets.
These extensions highlight key parts of your products and services. They show as a header and then list values underneath your text ad.
These are a great way to promote product categories, promotions and other USPs.
These are simple and easy to create, and the template allows you to provide all the relevant information while helping to group and list all of your Structured Snippets, so no key offerings are missed out.

How To Upload:
Extensions can be uploaded in exactly the same way. The only variation is that you have to select the correct extensions that you are trying to upload on the left-hand side underneath the drop-down called ‘Shared Library.
Here you will see all of the extension types and the extensions referenced in our template:
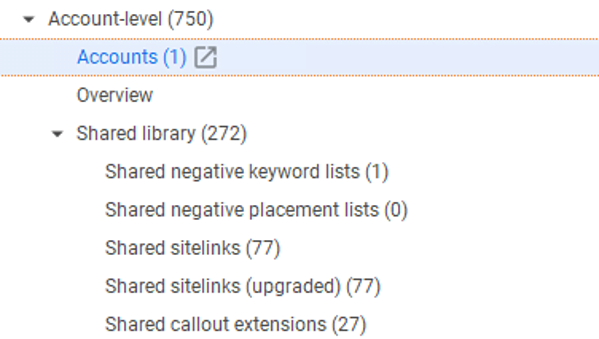
Once you have selected the correct extension in the shared library follow the below steps:
- Copy all of the data in the template. Depending on the extension type, you may need to delete the ‘length’ column before you copy the data
- Navigate to the correct extension within the Shared Library
- Select ‘Make multiple changes’
- Once the window pops up, paste your data and ensure the columns at the top match the template. Don’t say ‘not importing’ if they say this. Press the drop-down and select the correct heading.
- Once done, hit the process and review your changes. You should then see the number of extensions you have added in the preview section. Once reviewed, press ‘Finish and review changes’
- Then click ‘Keep’ at the top of the editor where it says ‘Review changes’
You have now uploaded your new extensions to the shared library, but unlike the other upload methods, you now need to associate this to either an account, campaign or ad group level.
Luckily this is very simple to do.
Simply head back into the relevant extensions window within the shared library and select all of the new extensions you want to attach to your ads or campaign.
Then select your association method, either at the account, campaign or ad group level and select the relevant destination.

You can download the template containing all three Google Ads Editor Extension Templates below:
- Google Ads Editor Extensions Template
Summary
The Google Ads Editor is a powerful but, at times overwhelming tool. You can make vast changes to your account and drastically scale performance by using it, but that can be time-consuming.
By using these free templates, you’ll be able to increase adoption, efficiency and the volume of changes you’re able to make.
